Hi everyone, hope you've all had a lovely weekend.
Todays step by step tutorial is on a winged gold, brown smokey eye.
Below is a quick step by step of how I created these eyes.
Products Used
Anastasia Beverly Hills Dipbrow: Auburn
Illamasqua Skinbase: 7.5
Anastasia Beverly Hills Eyeshadow: Amrezy Palette - Morocco & Glisten
Illamasqua Pigment: Incite
Illamasqua Prescion Gel Liner: Infinity
Mac Eyeshadow: Swiss Chocolate
Mac Paintpot: Soft Ochre
Ardell Eyelashes: Demi Wispies
Red Cherry Eyelashes: 747m
Duo Lash Glue
Maybelline Falsies Mascara
Start
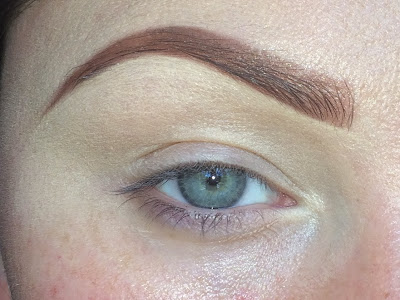
First off I applied the paint pot all over my eyelid. This is to mask any blemishes on my eyelids like veins and redness and also to act as a base primer to hold the eyeshadows on. For this you can use your concealer or foundation if you don't have any eye primers. I also applied the auburn dipbrow onto my brows to thicken up my shape and fill in any gaps where my hairs are sparse. To do this I used an angled brush and lightly feathered the brows on my brows.
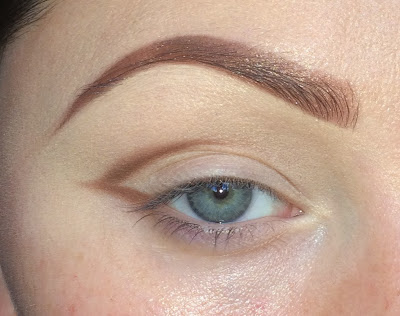
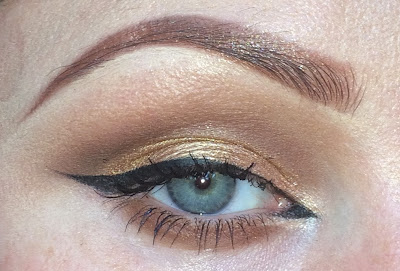
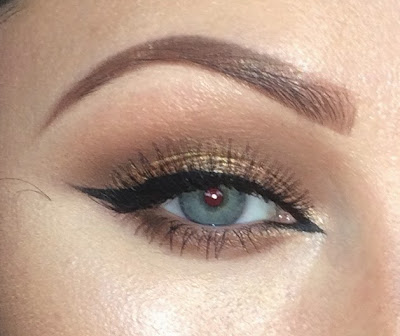
To start off the eyeshadow, I applied swiss chocolate in a V shape, winging out the eyeshadow then bringing it back through the socket. I did this to mark out where I wanted the eyeshadow as I knew I wanted to wing the eyes out. If you have far set eyes and don't want to create a winged eye, just keep the shadow in line with the end of your eyes.
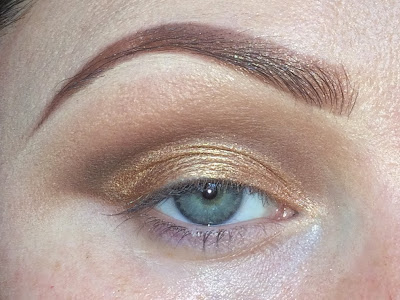
Using a blending brush, I applied a small amount of Morocco eyeshadow from the Amrezy palette and blended through the socket into the brown eyeshadow I previously applied. The trick is to keep blending until it all looks seamless, you don't want any harsh lines so make sure that you use a little bit of shadow at a time as applying too much shadow can cause a mess.
I then applied the gold pigment by Illamasqua all over the eyelid, trying to keep the gold shadow under the socket line so the shape is still neat. You can use any gold eyeshadow/pigment you prefer.
Using a fine brush I bought from an art shop for under £5, I applied the Illamasqua gel liner along my lashline. I followed the shape I created with the eyeshadows and winged it out to a point. My eyelids are quite wrinkly so a good tip for applying eyeliner is to hold the skin around your eyes upwards and tightly so the liner can go on easier.
I then started to create a point at the inner corner of my eye to really accentuate the cat eye look. This type of liner shape is perfect to create that arabic makeup look so you could try incorporating this in another heavier look. This shape eyeliner is really difficult to create if you don't have a fine enough brush so I would recommend going to an art shop to find a cheap fine brush or buying a makeup brush that is thin enough. I also applied the mascara to the lashes which is something I would always say you should do before applying any false lashes.
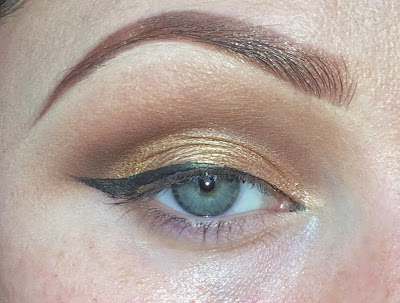
Under the eyes, I applied the swiss chocolate eyeshadow and blended the edges with the morocco shadow. I added a touch of Glisten from the Amrezy palette just at the inner corner of the eyes. I then applied the Ardell lashes first then the Red Cherry lashes on top to create a lovely feather effect.
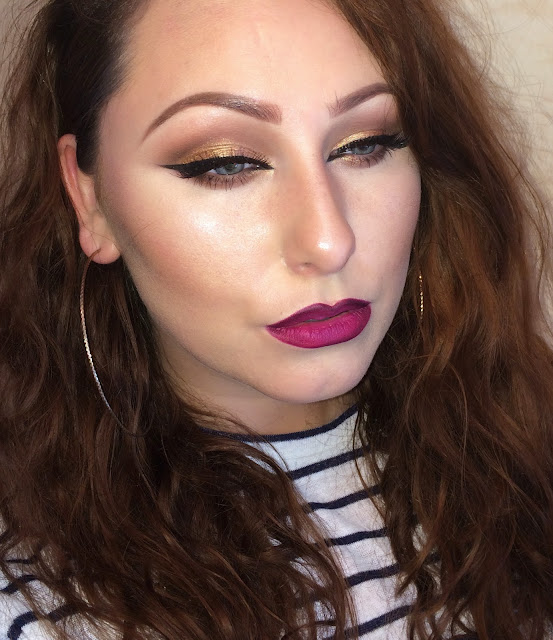
The finished look complete with my simple sculpt using Illamasqua Skinbase foundation and a dark pink lip using my mac lip pencils.
I hope you all found this step by step tutorial helpful. You can tweak this look to suit you and your occasion. If your going to an Asian wedding, this look would be perfect, you could use the same technique but with different colours. You could do a subtle version of this look by not applying such a strong liner, it all depends on your personal preference.
Thanks for looking
Suzy x